
How to build an Ambilight for every HDMI input source
This guide will then go one step further and enable the ambilight effect for all kind of HDMI input sources like PS3, XBOX, Chromecast etc.
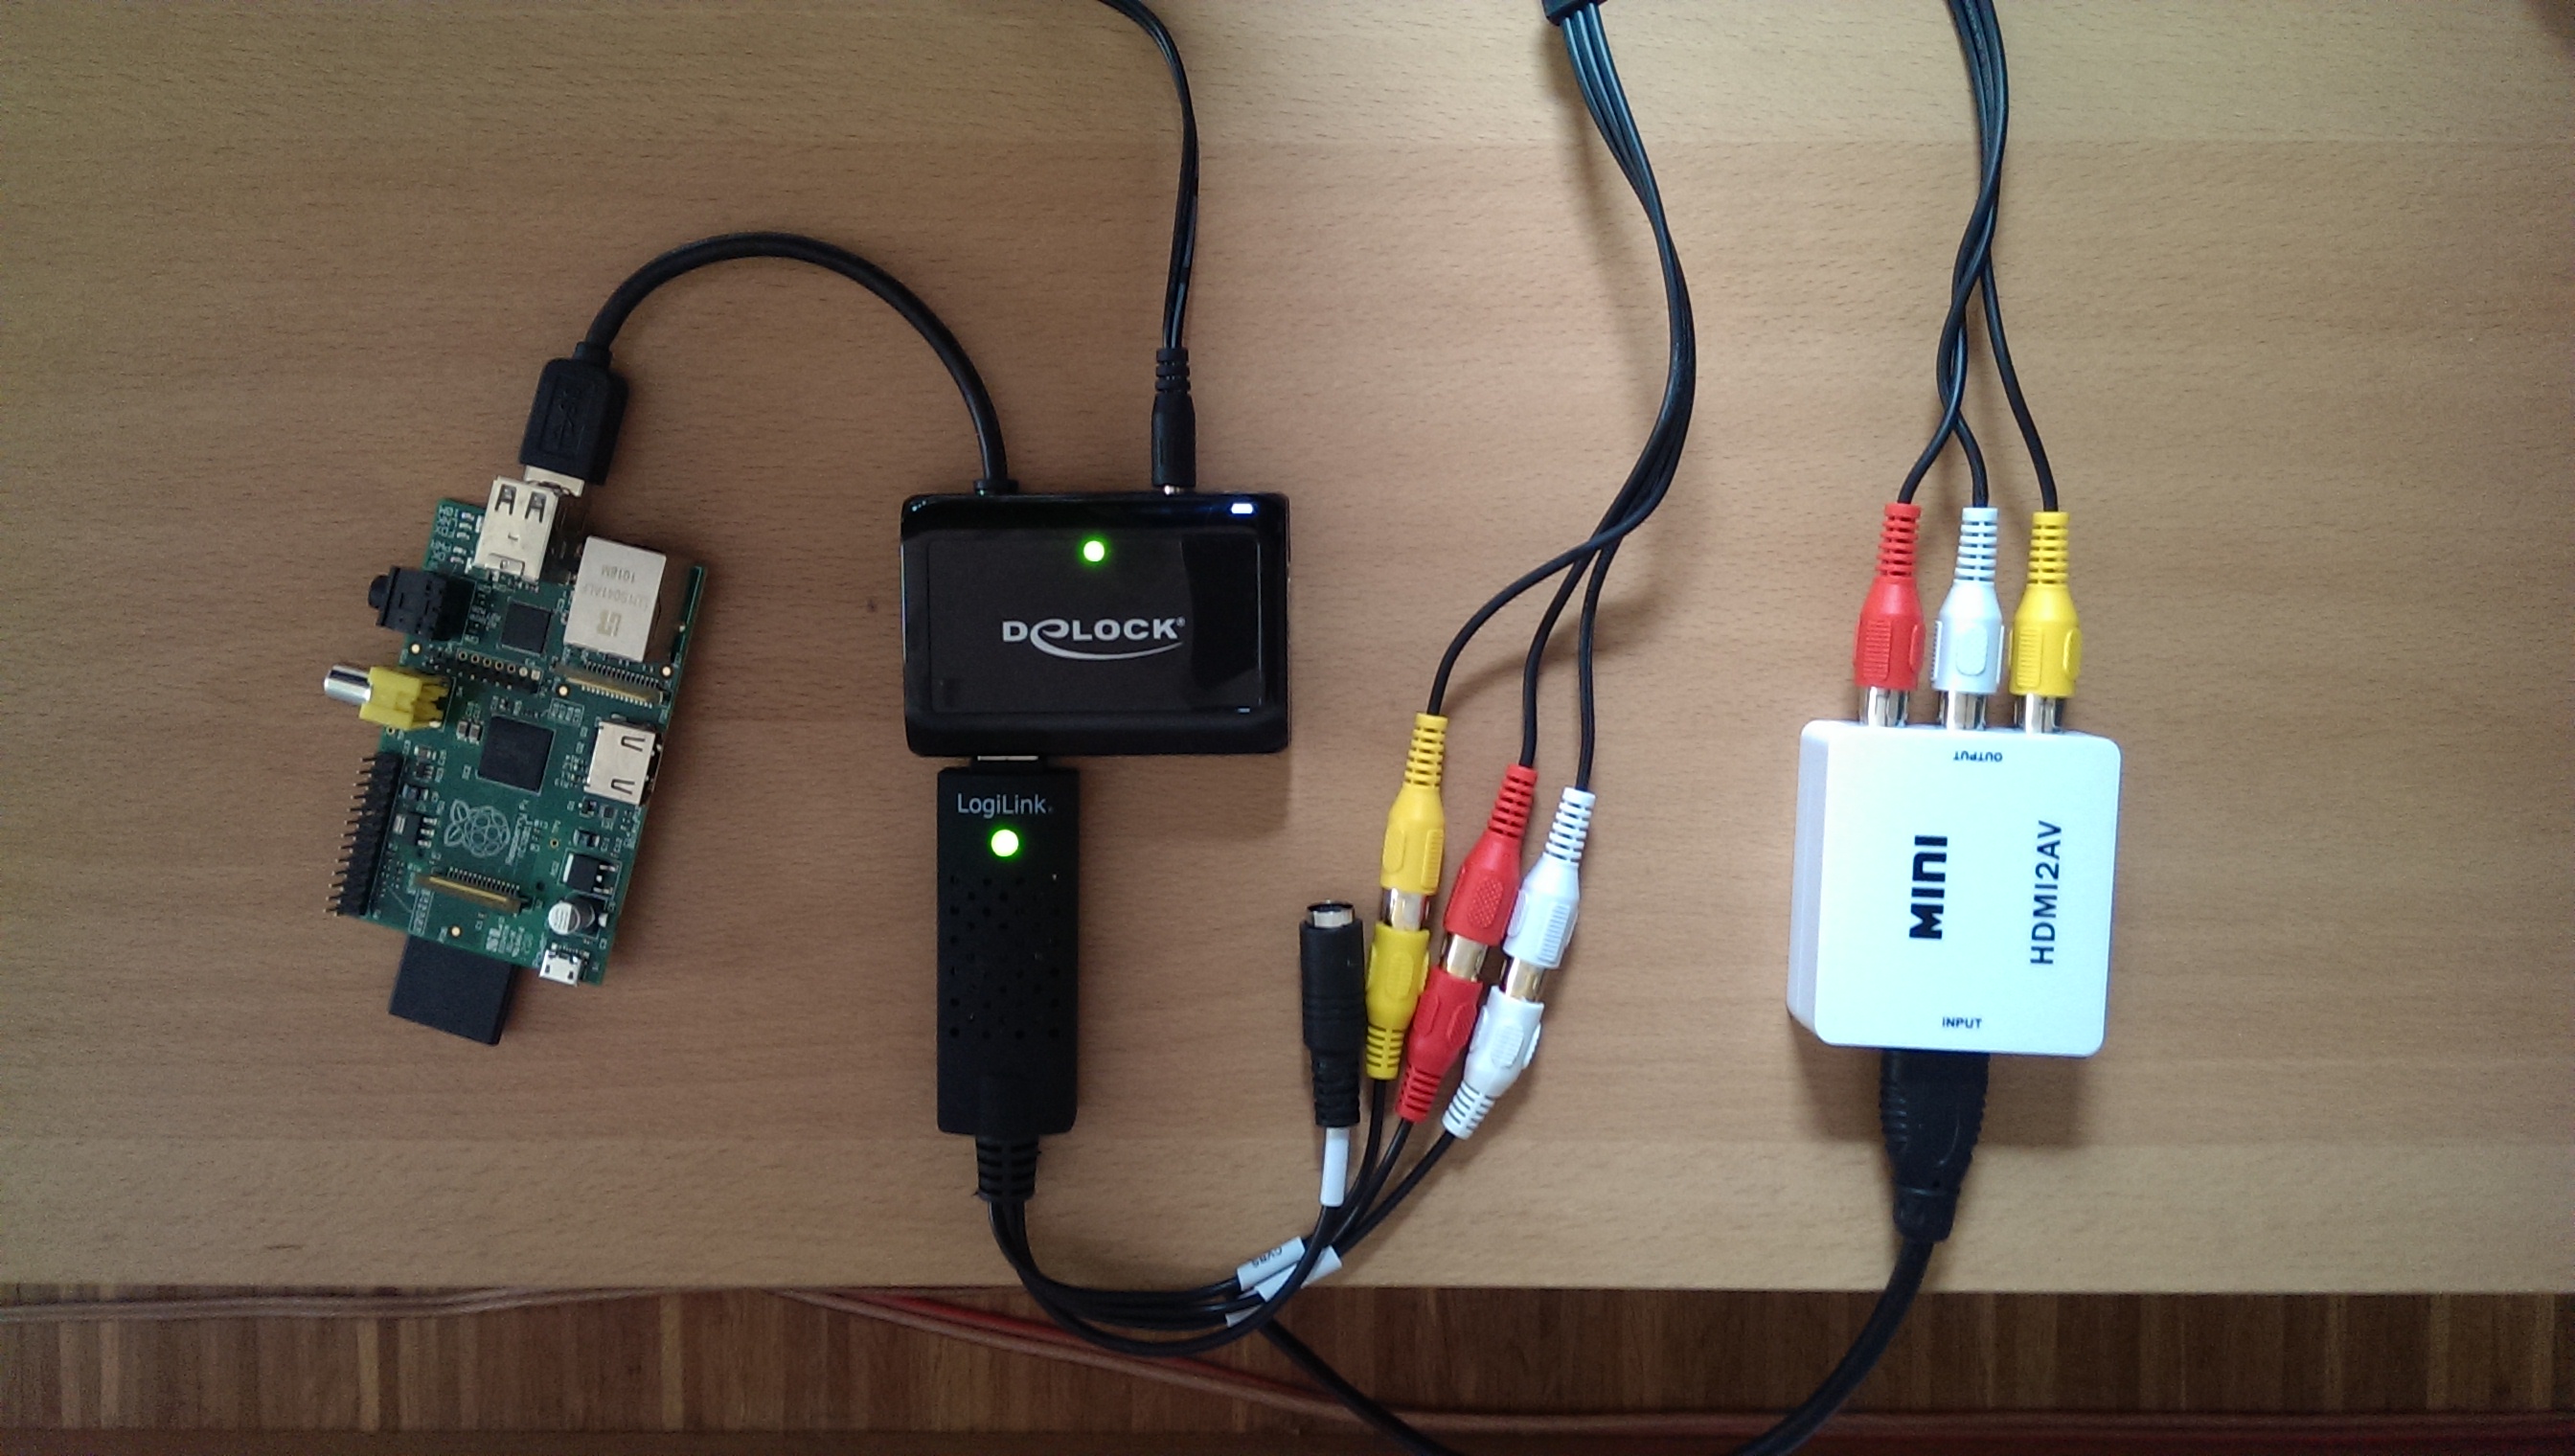
We need to get the color information from an HDMI input signal. For this purpose, it’s necessary to transform the digital HDMI signal to an analog composite one with a converter. After this, we can grab the composite signal with an USB video grabber connected to the Raspberry Pi. Now we’re able to feed Hyperion with the color information by the video grabber.
Parts list
| AVR Receiver | It’s essential. Most TVs don’t offer an HDMI output |
| HDMI to Analog converter | Speaka Professional HDMI / Composite Converter. There are several others on the market, make sure that you got one with 1080p support. Check this guide for more details about the available chipsets |
| 2 port HDMI splitter | My AVR features two HDMI outputs. Otherwise make sure you’ll get one! |
| USB Video Grabber (Easycap) | |
| Composite cabel | Just a standard video cinch cabel |
| Active USB Hub | The Raspberry won’t be able to power most of the devices directly from it’s USB port. |
Let’s wire it up. Connect the HDMI output from your AVR or from your HDMI splitter to the HDMI / Composite converter input. Use the composite cabel for connecting the USB video grabber with the Composite converter analog output. Plug the USB video grabber into the active USB hub, connect the hub to the Raspberry Pi.
If you already have a running media center then you might already have an analog video output on this machine. In this case, connect the analog output to the grabber, directly. Another possibility would be to go for an DisplayPort to composite converter that connects to the USB grabber. For both solutions, make sure that your existing media center is capable of playing your media to both outputs, simultaneously otherwise you’ll need to go for a 2 port HDMI splitter (without AVR) and HDMI to composite converter.
Here’s my setup connected, ready for video capturing from any HDMI input.

1. USB Video Grabber setup
Connect the USB Video Grabber to the Raspberry and type
// List all connected USB devices
lsusb
// If you're lucky and got a supported STK1160 chipset device, it should list following id:
ID 05e1:0408 Syntek Semiconductor Co., Ltd STK1160 Video Capture Device
// If successfully loaded, your grabber's video input should be found under /dev.  For example: /dev/video0
ls /dev/video*
// Remember the output, we'll need it later
Unfortunately, my device with “ID 1b71:3002” features a Fushicai UTV007 chip, which is only initial supported with kernel 3.11. This forced me to compile the kernel module myself. If you got the same problem, here’s my precompiled module “usbtv.ko” for Raspbmc with kernel 3.10.36. Make sure you first load the modules “videobuf2-vmalloc” and “videobuf2-core”, than load the module with insmod usbtv.ko.
OpenElec (>=4.2.1) has the driver for Fushicai UTV007 already included, therefore it will work out of the box. Remember, to enable ssh you have to boot OpenElec with TV connected. After that, you won’t need the installed XBMC/KODI anymore. It seems like the current Raspbmc release has the driver not included. SSH to openelec and install hyperion:
curl -L --output install_hyperion.sh --get https://raw.githubusercontent.com/tvdzwan/hyperion/master/bin/install_hyperion.sh
sh ./install_hyperion.sh
Then copy your hyperion.config.json to the shared SMB “Configfiles” folder from your host system. The shared “Configfiles” folder is actually mapped to /storage/.config on the Rpi filesystem. After a Rpi reboot, Hyperion should autostart and load the config from /storage/.config/hyperion.config.json automatically, though.
Remember that you have to set the library path for OpenElec setups before you can execute any hyperion command:
cd /storage/hyperion/bin
Stop / Restart hyperion manually:
killall hyperiond
LD_LIBRARY_PATH=/storage/hyperion/bin /storage/hyperion/bin/hyperiond /storage/.config/hyperion.config.json
Take a screenshot from the grabber with following command. Remember to kill hyperiond before you can execute this command properly!
LD_LIBRARY_PATH=/storage/hyperion/bin /storage/hyperion/bin/hyperion-v4l2 /storage/.config/hyperion.config.json --screenshot
For further instructions, make sure to checkout the documentation.
2. Hyperion configuration
Hyperion already features capturing color information from a USB video grabber. Add following configuration to your hyperion.config.json file to enable it.
        /// Configuration for the embedded V4L2 grabber
        ///  * device          : V4L2 Device to use [default="/dev/video0"]
        ///  * input           : V4L2 input to use [default=0]
        ///  * standard        : Video standard (no-change/PAL/NTSC) [default="no-change"]
        ///  * width                : V4L2 width to set [default=-1]
        ///  * height               : V4L2 height to set [default=-1]
        ///  * frameDecimation      : Frame decimation factor [default=2]
        ///  * sizeDecimation       : Size decimation factor [default=8]
        ///  * priority             : Hyperion priority channel [default=800]
        ///  * mode                 : 3D mode to use 2D/3DSBS/3DTAB (note: no autodetection) [default="2D"]
        ///  * cropLeft             : Cropping from the left [default=0]
        ///  * cropRight            : Cropping from the right [default=0]
        ///  * cropTop              : Cropping from the top [default=0]
        ///  * cropBottom           : Cropping from the bottom [default=0]
        ///  * redSignalThreshold   : Signal threshold for the red channel between 0.0 and 1.0 [default=0.0]
        ///  * greenSignalThreshold : Signal threshold for the green channel between 0.0 and 1.0 [default=0.0]......
        ///  * blueSignalThreshold  : Signal threshold for the blue channel between 0.0 and 1.0 [default=0.0]
        "grabber-v4l2" :
        {
                "device" : "/dev/video0",
                "input" : 0,
                "standard" : "no-change",
                "width" : 1,
                "height" : 1,
                "frameDecimation" : 2,
                "sizeDecimation" : 4,
                "priority" : 800,
                "mode" : "2D",
                "cropLeft" : 10,
                "cropRight" : 8,
                "cropTop" : 12,
                "cropBottom" : 19,
                "redSignalThreshold" : 0.4,
                "greenSignalThreshold" : 0.2,
                "blueSignalThreshold" : 1.0
        },
To adjust the cropping for your setup, you have to change the values “cropLeft, cropRight, cropTop, cropBottom” and make sure “device” matches with your ls /dev/video* output!
// Stop hyperion
sudo initctl stop hyperion
// start any HDMI video source and make a screenshot from the grabber input. This will use the external v4l2 grabber
hyperion-v4l2 --crop-top 0 --crop-bottom 0 --crop-left 0 --crop-right 0 --size-decimator 4 --frame-decimator 2 --red-threshold 0.4 --green-threshold 0.2 --blue-threshold 1.0 --screenshot
Check the created screenshot.png, adjust the crop-* values till the grabbed input has no black borders left. Then put the calibrated values into your /etc/hyperion.config.json file.
Screenshot from my USB grabber input, I was able to get rid of the upper and lower borders by adjusting the cropTop and cropBottom values. I was able to get rid of the green lines after increasing “frameDecimation” to 8 but then a lot of frames were skipped and the LED’s were out of sync to the moving picture. So I set it back to 2.

If you only want to grab the signal from the v4l2 video grabber, make sure that you remove the “framegrabber” and xbmcVideoChecker sections.
// After you have checked the screenshots and configured your cropping values, start hyperion with the internal v4l2 grabber again
sudo initctl start hyperion
Let’s test some videos! If you don’t like the results, try to fine tune your setup with different SignalThresholds or try to adjust the hsv settings. Make sure to read this comprehensive guide about color transformation.
When you switch the HDMI source on your AVR to non HDMI sources, like for example audio only devices, the LED’s will light up in blue. Blue is the default color if no video source was detected for many AVRs. You can disable the LED’s in this situation by setting the blue-threshold value to 1.0.
3. Conclusion
Now you should be able to use your Ambilight for any HDMI input you have connected to your AVR. If you have any question, feel free to ask in the comments section. Enjoy your unleashed Ambilight!
Hi Christian,
Will this setup work with the Raspberry Pi 2 Model B?
Thanks!
–
Ted
Yes, it should.
Thank you very much for all your time and effort in writing this and your other tutorials! Your effort is appreciated more than you know by guys like me!
Is it possible to modify/add to the set up you outlined to enable triple monitor support? I’d like to use this when playing pc games across all three screens as well as for playing xbox on a single one. I have a gtx980ti, currently running 3 1080p displays via display port to hdmi cables. Any suggestions or recommendations you may have would be hugely appreciated because experienced advice = hours of reading forums! Thank you
Hey Chris, great post.
I’ve built basically the exact same setup with my AVR, and I’m noticing an odd problem that perhaps you encountered during your setup.
I’m using a Pioneer VSX1123 AVR, and passing my 2nd HDMI zone to the HDMI2AV converter. However, when I do this my AVR auto-negotiates the HDMI connection of both the main hdmi zone and 2nd hdmi zone to stereo mode.
Curious to know which AVR you’re using, and if you noticed something similar. I know my problem is the HDMI2AV converter because when I unplug its power the main zone reverts back to PCM (5.1).
Obviously, I want my main zone to be in surround sound mode so this is becoming problematic.
Hi Dan,
I’m using a Pioneer SC-LX83 and don’t experience this behavior. You should try another HDMI2AV converter with a better chipset that supports PCM (5.1) signals.
Regards Christian
I’m having trouble getting the screenshot to show from the video grabber. It works, but there are some colours missing in the horizontal axis and they seem pale/washed out compared to running the screen grabber through kodi without the usb grabber attached.
My attempts to killall hyperiond work fine and the lights switch off, but then trying for the screenshot gives this error message….
LD_LIBRARY_PATH=/storage/hyperion/bin /storage/hyperio
n/bin/hyperiond /storage/.config/hyperian.config.json
Application build time: Mar 6 2015 20:57:44
QCoreApplication initialised
Selected configuration file: /storage/.config/hyperian.config.json
terminate called after throwing an instance of ‘std::runtime_error’
what(): Failed to parse configuration: * Line 1, Column 1
Syntax error: value, object or array expected.
Aborted
Hi Chris, is the path to hyperion.config.json correct? Looks like you have a typo in the file name. If the file exists under this path then the syntax in the config file is wrong. Double check the config structure if there’s a missing colon or something like that.
Regards Chris
Hi, thanks for the speedy reply. My heyperion.config is in the configfiles folder when browsing \\openelec\configfiles in windows file explorer. The other path storage/hyperion/bin is not showing a folder when browsed in the same way however. Is the hyperion folder browsable through file explorer or hidden? This is my first time doing something like this and in all honesty i found some aspects a little tricky so n00b friendly replies are a must haha. hyperion and kodi seems to autoswitch between the built in screengrabber and the hdmi vl42 grabber depending on whether the yellow rca is connected. Hyperion screengrabber looks fantastic after a little play with the gamma and saturation settings and finding nemo looked utterly phenomonal, rippling light from the water all up the wall and colourful corals were fantastic. Would you advise using the HDMI vl42 grabber for every source once the screenshots and cropping are setup properly?
I’ve found the screenshot and cropped it to remove black bars. Bright lights have impact, colours are vivid and bright, the only trouble i’m having now is that i’m struggling to get the led’s to turn off for black values. Even on a fully black screen the LED’s are producing a very pale light with a tint of green. I’ve tried adjusting the signal thresholds but it seems to need a lot of adjustment on the threshold values for each colour in the color transform settings and at these higher values it introduces weird and vivid pieces of colour that don’t look like they should be there. Any ideas?
My v4l2 signalthresholds are all set to 0.1, can you give me a little explanation on how you tested/configured your own and came up with the values for them?
Thanks again!
Hello!
I have bought one cheap clone of Easycap from ebay. It seems to be with somagic SMI-2021CBE chip and I can’t get it working with RasPi. I would like to have one with Fushicai UTV007 chip. I am wondering if somebody could suggest me a retailer where can I buy one..?
I followed these instructions and have OpenElec 5.0.5 installed. lsusb does not list my video grabber. It is plugged in and light is on. Any help?
Thanks for an excellent article.
I have a similar setup as you where the AVR does the splitting. Unfortunately I have gotten a cheap/fake HDMI to AV adapter only capable of 480/576 resolution. Thus the AVR negotiates poor resolutions for all sources. This seller explains what you should buy (http://www.aliexpress.com/item/Free-Shipping-Mini-HD-Video-Converter-Box-HDMI-to-RCA-AV-CVSB-L-R-Video-1080P/32248986965.html). Just wanted other reading this blog to know.
For the grabber I have a EasyCap (DC60++) based on a eMPIA em28xx/em2860 chip (http://eud.dx.com/product/easycap-usb-2-0-audio-video-capture-surveillance-dongle-with-mac-os-support-844026319). This seem to work fine on the latest rpi 3.18.7 kernel on raspbian (“rpi-update” did the update). It should work on openelec 5.0.4 (with the same kernel).
Thanks for the hint wasn’t aware about those three different chipsets: http://m.aliexpress.com/item-desc/32248986965.html
hi Christian when you say an AVR Receiver is needed for hdmi output is the arc hdmi on most tvs good enough for the job ?
Hi craig, I don’t understand your question? A tv doesn’t feature a HDMI output, so this won’t work. Or what do you mean? Regards
The ARC hdmi port on your tv unit outputs an audio signal, I believe. ARC stands for Audio Return Channel. It’s designed to connect a home theater receiver to your tv. Audio and video from the receiver are sent to the tv, and audio from any other sources connected to the tv is sent back to the receiver, eliminating the need for separate audio and video connections. I’m pretty sure the ARC hdmi port won’t work for this.
That’s correct. We can’t use it as input for a video grabber.
Thanks for the awesome info! I’m almost done getting my system setup. Thought I would share my experience buying the USBTV007; I bought this item
http://www.ebay.com/itm/291025947107?_trksid=p2059210.m2749.l2649&ssPageName=STRK%3AMEBIDX%3AIT
From “clickcomputerparts”. It’s the Fushicai chipset and works great with my Pi on OpenElec 5.0.1.
I purchased the same video grabber (i am in the US) and all i can grab is a black screen. Can you please share your hardware setup and config on how you made it work?
Fushicai:
http://www.ebay.com/itm/291025947107?_trksid=p2060778.m2749.l2649&ssPageName=STRK%3AMEBIDX%3AIT
HDMI2AVI:
http://www.amazon.com/gp/product/B008FO7PQA/ref=oh_aui_detailpage_o02_s00?ie=UTF8&psc=1
HDMI splitter:
http://www.amazon.com/gp/product/B005HXFARS/ref=oh_aui_detailpage_o08_s00?ie=UTF8&psc=1
LED:
http://www.amazon.com/gp/product/B00MINTF2Q/ref=oh_aui_detailpage_o01_s00?ie=UTF8&psc=1
So I have pretty much the exact same hardware as you, but my setup is not working. I can grab screenshots on the Pi but the LEDs never respond. I just verified the LEDs work with my Arduino, so it’s probably just a config issue. I’m pulling my hair out; I’ve checked and rechecked my config file and I don’t know why the LEDs don’t respond. I’m using OpenElec 5.0.3, and even did a mod to make sure SPI was enabled (apparently 4.2.1 to 5.0.3, SPI is disabled by default…?). Not sure what else to try….
did you ever figure this out i just got this working with openelec 5.0.4 with a rpi2
Hi, I’m planning to buy a new monitor which supports 144hz. HDMI does not support that @ 1080p. I will have to use either displayport or DVI-D. Now there aren’t many direct converters for either DVI-D or DP to composite, and the ones that exist are extremely expensive.
Now there are lots of active DVI-D to VGA and VGA to RCA cables. I would like your opinion on wether you think it’d work. I think it SHOULD work because the only real conversion of signal is with the DVI-D to VGA adapter, and the VGA to RCA is simply an adapter. However I have had bad experiences with using more than 1 type of adapter so I would appreciate your advice.
i found this guide to be very helpful, I have a few questions before beginning my set up. I am adding this to a custom built 143″d (125″x70″) screen, so I figure I need approx 10m LEDs. I’m going to use the ws2812b LEDs to take advantage of their higher led density. What kind of power supply would I need and would there be any issue with using a long cable to run between my hdmi receiver n the back of the theatre room to the ambilight components hidden behind my screen about 10m away?
It should work with the cable, you want to use a cable with a bigger diameter if you don’t get a proper signals to the lights. I would calc with 50 mA for each LED, keep that in mind if you go for more leds on a strip. I don’t think 2812b strips will cause a better effect in the end, though.
Check this really good guide about those LED strips, especially the voltage drop part..: https://www.pololu.com/product/2547
Hi there,
Christian, thanks for the guide! works very well.
If someone here has problems purchasing the utv007 may give this link a try, i had luck.
http://www.aliexpress.com/item/EasyCAP-USB2-0-Video-Adapter-with-Audio-Video-Capture-card-Video-editor-and-recorder-video/2054459376.html
did someone here tried to connect 2pieces of utv007 to the raspi?
I’d like to grab not only the signal from the hdmi bus, but also from scart out of the TV. -the TV has a build in tuner.
unfortunately the scart out does not work if input is hdmi on my tv.
gave it some trys already, but I think I’m doing something wrong, or, it’s not supported. as soon as I add video0 and video1 into the config it stops working at all…
Thanks for the tips 🙂
hi Christian!
First thank you for your very helpful topic. I succeeded in running my own ambilight on openelec with a fushikai grabber. It works on my PC but when I power up the hdmi2av (or the grabber) it forces the Pc to lower its resolution. It seems to be the same issue as Tamesh. I can not understand how it is possible and how I can fix this annoying problem… Any idea?
Cheers,
Alex
I’d try a better splitter that doesn’t force the PC to reduce it’s resolution and make sure the hdmi2av supports 1080p as input.
Hello Christian
I’m new into this adventure !!
My ambilight work fine but how make for a 3d movie.
By defaut, the setting is “2D” how make change when have a SBS or TAB movie ?
I have a grabber with chip Fushicai and raspbmc.
Regards
Sorry for my bad english !!
Hi Christophe
Unfortunately, auto 3d detection is not supported for v4l2 grabbing. This only works for the hyperion XBMC grabber.
Hi Christian
Thanks for your answer.
Thus the solution for 3d movies would be to have a 2nd raspberry ?
To install openelec on the 2nd raspberry, but is it possible to connect leds in parallel with the 1st raspberry ?
Well, you’d need a Rpi with a media center installed as described in this post: How to build your own Ambilight TV with Raspberry Pi and XBMC for auto 3d detection to work.
I’m actually not quite sure what happens when you connect the LED strip in parallel to the two Rpi SPI controllers. They would most likely interfere each with other especially if they are both turned on. I could imagine that a simple hardware switch between the Rpi and the LED strip could solve this problem but then you have to manually choose which Rpi you want to use.
You have to try it out and see if it works.. 🙂
Thanks for your answer.
I am soon going to study it.
I have another question, i have a Rpi with raspbmc and fushicai support from lightberry. It’s possible that hyperion detect the strips black ?
I don’t have light when i have strip black.
I don’t have lightberry leds, i have led strips ws2801.
No just have a second hyperion JSON set up for 3D and run that when watching a 3D movie.
Hi,
I have an issue where my PS4 is connected to the splitter, but my monitor then auto detects the max res. as 480p and the video grabber (UTC007) works fine, but that resolution is no good for the PS4 so if I force it to 1080p then the video grabber input stops receiving anything, has anyone encountered this issue?
Cheers, Tamesh
Hi Tamesh, it seems like the splitter is detected as unknown HDMI device and therefore the resolution is automatically reduced, would try a better one.
It’s strange that the video grabber stops working with 1080p, the HDMI to analog converter should in any case reduce the resolution to one that is supported by the analog video grabber. Maybe the converter doesn’t support 1080p as input resolution?
Regards Chris
Hi Chris,
Do you think if i just use a RpiB do you think that would help?
No, I’d try to replace the grabber instead. Since there are currently some issues with the STK1160 grabbers in combination with the newer Linux kernels, I’d go for a Fushicai UTV007. They work pretty good with OpenElec >= 4.2.1.
Hi Christian,
I found your article very handy for setting up and configuring hyperion in openelec, however i have two issues that i can’t seem to resolve. The first is hyperion seems to crash within 30-60 seconds.
/storage/hyperion/bin/hyperiond.sh /storage/.config/hyperion.config.jso
n /dev/null
Effect directory can not be loaded: /opt/hyperion/effects
effect Rainbow swirl fast not found
terminate called after throwing an instance of ‘std::runtime_error’
what(): VIDIOC_DQBUF error 19, No such device
Aborted
XBMC:~ #
i seem to have to restart hyperion before it will pick up the usb video grabber.
Any help would be appreciated.
Cheers,
Chris
Hi Chris, /dev/null seems wrong to me. Did you configure your video grabber correctly in the “grabber-v4l2” section in hyperion.config.json?
e.g
"grabber-v4l2" :

        {

                "device" : "/dev/video0",

                "input" : 0,

...

}
Hi Chris,
First of all thank you very much for taking the time to share (and update) this great tutorial ! Extremely clear and very accessble even for beginners like me 🙂 The end result looks fantastic and is definitely motivating !
I already spent few weekends trying to set this up… but I am not quite there yet 🙁 I am using a Raspberry PI running latest version of RaspBMC as well as a Sabrent USB-AVCPT A/V-to-USB 2.0 Digital Video Adapter (which I double checked to be an STK 1160 – 48000 chip – as shown in output of lsusb below) plugged to a powered USB hub. I had to downgrade from Kernel 3.12 to 3.10 in order to get it recognized as /dev/video0. I was also able to successfully install Hyperion and light up my LEDs using hyperion-remote.
I am currently stuck on capturing a screenshot via my USB grabber: after stopping Hyperion, I tried to run sudo hyperion-v4l2 –screenshot but it remains stuck on V4L2 grabber started (please see command output below) and does not capture a screenshot in my home folder. At this point I don’t really know what else I can try…
Could you please let me know if that sounds like a familiar error / behavior to you ?
Of course please let me know if there is anything else I should provide to further clarify my issue or setup ! Thank you !
pi@raspbmc:~$ lsusbBus 001 Device 002: ID 0424:9514 Standard Microsystems Corp.
Bus 001 Device 001: ID 1d6b:0002 Linux Foundation 2.0 root hub
Bus 001 Device 003: ID 0424:ec00 Standard Microsystems Corp.
Bus 001 Device 004: ID 1a40:0101 Terminus Technology Inc. 4-Port HUB
Bus 001 Device 005: ID 05e1:0408 Syntek Semiconductor Co., Ltd STK1160 Video Capture Device
pi@raspbmc:~$ lsusb -v -d 05e1:0408 | grep tSamFreq | sed -e "s,^.* ,,"
Couldn't open device, some information will be missing
48000
pi@raspbmc:~$ sudo hyperion-v4l2 --screenshotV4L2 width=720 height=480
V4L2 pixel format=UYVY
V4L2 grabber signal threshold set to: {0,0,0}
V4L2 grabber started
pi@raspbmc:~$ sudo hyperiond /etc/hyperion.config.jsonApplication build time: Sep 22 2014 20:48:42
QCoreApplication initialised
Selected configuration file: /etc/hyperion.config.json
ColorTransform 'default' => [0; 49]
Device configuration:
{
"colorOrder" : "rgb",
"name" : "MyPi",
"output" : "/dev/spidev0.0",
"rate" : 250000,
"type" : "ws2801"
}
Hi Quentin, I don’t have a STK1160 to test. Could you try to grab the screenshot with an additional command: hyperion-v4l2 -d /dev/video0 –screenshot.
Regards Chris
Hi Chris,
Thanks for taking the time to help me ! I have been trying several things (fresh installs of OpenElec and RaspBMC, different Kernels 3.10 and 3.12). But no matter what I tried I am still stuck on V4l2 grabber started.
I tried the command you mentioned:
pi@raspbmc:~$ hyperion-v4l2 -d /dev/video0 –screenshot
V4L2 width=720 height=480
V4L2 pixel format=UYVY
V4L2 grabber signal threshold set to: {0,0,0}
V4L2 grabber started
pi@raspbmc:~$ v4l2-ctl –all
Driver Info (not using libv4l2):
Driver name : stk1160
Card type : stk1160
Bus info : usb-bcm2708_usb-1.3.1
Driver version: 3.10.24
Capabilities : 0x85000001
Video Capture
Read/Write
Streaming
Format Video Capture:
Width/Height : 720/480
Pixel Format : ‘UYVY’
Field : Interlaced
Bytes per Line: 1440
Size Image : 691200
Colorspace : Broadcast NTSC/PAL (SMPTE170M/ITU601)
Video input : 0 (Composite0: ok)
Video Standard = 0x00001000
NTSC-M
Streaming Parameters Video Capture:
Frames per second: 29.970 (30000/1001)
Read buffers : 2
Priority: 2
I am thinking to test another grabber… maybe the Fushicai…
Please let me know if you have any other ideas ! Thanks again for the help !
Quentin
Hi Chris, I made some progress ! I finally got a screenshot using hyperion-v4l2 (yay!). Unfortunately, the screenshot is really ugly… the image is black/white distorted and barely recognizable 🙁
Thanks again for the great tutorial !
Quentin
I am in the same situation with the stk1160. What’d you do to get the screenshot?
Hi Quentin, I have the same Sabrent USB-AVCPT A/V-to-USB 2.0 Digital Video Adapter and having the screenshot not being able to capture issue.
Can you please tell us how you fixed the issue?
========================
V4L2 width=720 height=480
V4L2 pixel format=UYVY
V4L2 grabber signal threshold set to: {0,0,0}
V4L2 grabber started
….. ***** STUCK HERE *****
======================
Hi Chris,
I have tried to do some more fault finding. I have tried a few things but i think the main thing is that I just have the frame grabber plugged into my Rpi but have not connected the other end and tried to take a screenshot and got the same screen as a usually do. So this would mean my framegrabber isn’t working. I did use an old TV with a composite out and tried that going straight to the Rpi but that still gave the same screenshot.
Is there another way I can test the framegrabber? Maybe using my laptop?
My TV has no analog input for the RCA cables so i can’t test that.
My system is connected as follow:
Blu-ray & Sky Box connected to HDMI Switcher input
Switcher output goes to HDMI Spliter input
Splitter output 1 is to the TV & output 2 goes to Analog converter
Analog Converter goes to Frame grabber
Frame grabber goes to Rpi
When i type:
LD_LIBRARY_PATH=/storage/hyperion/bin /storage/hyperion/bin/hyperiond /storage/.config/hyperion.config.json
I get the following;
XBMC video checker created and started
Display opened with resolution: 720×480
Frame grabber created and started
V4L2 width=720 height=480
V4L2 pixel format=YUYV
V4L2 grabber signal threshold set to: {255,255,255}
V4L2 grabber started
V4l2 grabber created and started
Json server created and started on port 19444
Proto server created and started on port 19445
XBMC Connected
BORDER SWITCH REQUIRED!!
CURRENT BORDER TYPE: unknown=0 hor.size=0 vert.size=0
Message from XBMC: {“id”:666,”jsonrpc”:”2.0″,”result”:[]}
XBMC checker: switching to OFF mode
BORDER SWITCH REQUIRED!!
CURRENT BORDER TYPE: unknown=0 hor.size=5 vert.size=0
Message from XBMC: {“id”:668,”jsonrpc”:”2.0″,”result”:{“System.ScreenSaverActive”:true}}
Message from XBMC: {“id”:670,”jsonrpc”:”2.0″,”result”:{“version”:{“major”:13,”minor”:2,”revision”:”0f3db05″,”tag”:”stable”}}}
V4L2 grabber stopped
effect finished
V4L2 grabber started
V4L2 Grabber: Signal lost
Does this give any more clues to whats wrong?
First of all thanks Chris for this great tutorial! I can’t wait to get everything going.
To Mark and whoever else may be having similar problems: I’m trying to process my Mitsubishi DLP’s analog out (no hdmi splitter or digital to analog converter). After much finagling I finally read the TV’s manual and found out its analog out doesn’t work with the HDMI inputs. And all I was getting from the video capture was black and green lines. As Chris mentioned the black and green screenshots are likely caused by no input signal. Might be relevant..something to look into anyways.
Hi Chris,
I making progress but it is all baby steps. I know have all my LEDS working and i am using a 2m cable to my Rpi and also managing to run it of a 3a micro USB supply.
But when I have my system all connected up the amblight doesn’t work with the TV. If i play a movie through OpenELEC it works fine. So i’m guessing its to do with the frame grabber, what can i do to check this?
Try to capture a grabber screenshot with hyperion. This allows you to analyse the captured analog video signal that hyperion uses to color up the leds.
When this seems ok, check the frame grabber config and its priority.
Regards
How do i take a screenshot with hyperion/openelec?
I tried to use the command in your guide but it doesn’t work with OE.
Connect to openelec and switch to dir “/storage/hyperion/bin” and execute hyperion-v4l2 with your settings. “LD_LIBRARY_PATH=/storage/hyperion/bin /storage/hyperion/bin/hyperion-v4l2 /storage/.config/hyperion.config.json -–screenshot” as descriped in the guide. Remember to kill hyperiond first.
I login in to OE and type:
killall hyperiond
This all works fine. I then change directory to hyperion/bin and type:
LD_LIBRARY_PATH=/storage/hyperion/bin /storage/hyperion/bin/hyperion-v4l2 /storage/.config/hyperion.config.json -–screenshot
From this i get the following read out and a screenshot in the bin folder of a black screen with lots of horizontal green lines.
V4L2 width=720 height=480
V4L2 pixel format=YUYV
V4L2 grabber signal threshold set to: {0,0,0}
V4l2 grabber started
V4l2 grabber stopped
If i type hyperion-v4l2 first as the start of a command it just says
-sh: hyperion-v4l2: not found
Does any of this make sense?
Well, if you have got a screenshot, than the grabber should work with hyperion. The green lines are ok, I got them as well. But it seeems like you don’t have any input signal or otherwise an input signal which shows a black image from your source. What and how did you connect to the splitter, grabber? Did you try out to connect the analog signal directly to the TV, most TVs still have got an analog input. This way we can make sure that your analog signal is fine.
Instead of converting the HDMI stream to composite, would it be possible to utilize the composite video monitor out on a receiver?
Hi Chad, yes this should be technically possible but you have to test if the avr is really capable of converting an hdmi input signal to hdmi and composite in parallel. You will still need an usb grabber, though
Let me know your results. Regards, Chris
When I do my lsusb, I get the following info:
pi@raspbmc:~$ lsusb
Bus 001 Device 002: ID 0424:9512 Standard Microsystems Corp.
Bus 001 Device 001: ID 1d6b:0002 Linux Foundation 2.0 root hub
Bus 001 Device 003: ID 0424:ec00 Standard Microsystems Corp.
Bus 001 Device 004: ID 1a40:0101 Terminus Technology Inc. 4-Port HUB
Bus 001 Device 005: ID 05e1:0408 Syntek Semiconductor Co., Ltd STK1160 Video Capture Device
Bus 001 Device 006: ID 0bda:8178 Realtek Semiconductor Corp. RTL8192CU 802.11n WLAN Adapter
but when I do the ls /dev/video* command I see the following:
pi@raspbmc:~$ ls /dev/video*
ls: cannot access /dev/video*: No such file or directory
Any ideas to try to get past this point ?
Thanks !
Hi Chris, I got it to work!!! Well sort of, the issue i had was that my data leads had come of the strip but as i had heat sinked them in i couldn’t see.
However my next issue is that not all the LED’s are working. I have 21 up the sides and 33 at the top & bottom. At the moment it stops at around the 73 LED, so it works up the first side and all along the top but as it starts coming down teh other side only the first few LED’s work.
Any Idea’s?
good job! 🙂
Well, this must be a problem with your hyperion.config.json. Doublecheck your hypercon config. Does the number on the bottom right represent your total LED count?
– Does your power supply offer enough power to power up all your LEDs?
I thought that, so I have been playing around with it so that if I choose a lower amount of LEDS it will stop but then when I increase the number to get past that 57 one it stops. I thought it could be the next LED in the row so added different ones and that didn’t work. I get 5v at the end of the string and my power supply is rated for 8 amps so that can’t be the problem. I even used a 3a micro USB power supply and that worked fine for the 57 LEDS.
Could it be that the 57th is preventing data going any further?
Maybe I need to make up another string of LEDs and test that and see what happens.
Unfortunately I have had no success getting the Somagic SMI-2021CBE Video grabber to work (Comes up with (no firmware) under the lsusb command.
Can someone verify that the chipsets that should work ?
I know STK1160 is mentioned in the article but I am having no luck finding that chipset to order. I also see the Fushicai UTV007 mentioned. Can someone clarify if these chipsets work properly in the Raspberry Pi/Raspbmc/Hyperion config from the article or so I need to ditch that configuration to look at the OpenElec that is mentioned on here (Is OpenElec analogous with the Raspbmc ?
Thanks for any clarification.
Update: I have found one with the STK1160 Chipset (If I get the solution working I’ll post a link of where to get it).
A couple of questions about updating the Hyperion Config step
1. Where do I add the snippet (I am thinking it would go right before “endOfJson” : “endOfJson”}
2. When I add this code, will the Hyperion Remote still work or will it be only driven by the HDMI source ?
Thanks !
1. Doesn’t really matter as long as you put it before “endOfJson …” and syntactically correct separated with a “,”. For a sample config, check this link.
2. It will still work
There is one you can order on CuteDigi website (http://www.cutedigi.com/video/easycap-1-channel-usb-20-video-capture-stk1160-chipset.html)
I’ve just received mine and it has the STK1160 Driver in it.
Good Luck
Hi Chris,
Really sorry about the ambush of messages but i do think i am close now.
For now ignore all my other comments and lets try and start again.
So I had another play with those 2 commands you gave and as far as i can tell from the command window in Putty they seem to work but nothing happens with my LED’s. What I also noticed is that i can seem the command line registering commands when I use the Hyperion APP but still nothing happens with the LED’s.
How can I check my LED’s?
Well, that’s good to hear.
There are a lot of different things to check:
– Check the device section in hyperion.config.json. Is the output set to “/dev/spidev0.0”? What is the output of “ls /dev/spidev*”? You could try setting it to “/dev/spidev0.1” and reboot.
– Doublecheck the spi bus connectors (DI,CI on the diagram), are they connected to the correct GPIO pin? Do you have a Revision 2 Rpi? Maybe check the pinout, it has slightly changed to the version shown in the post, which is for rev 1.0
– Did you connect the power supply directly to the +5V/GND connectors of the first LED strip’s input side and left the last LED strip’s output empty? Do you use a sufficient power supply? Try to power a shorter strip if all is connected properly.
HTH, Chris
Thanks for that I will try those things now but something else i read was that the length of my cables could cause an issue, my cables are about 2m?
You should test with much shorter cables first till it works.
Shorter cables didn’t work.
When i type ls /dev/spidev I get the response:
ls: /dev/spidev: No such file or directory
I got the pinouts from the drawing for Rpi B+
I have only made connections to 1 end of the strip. When i do plug in the power all the LED’s give a very quick and feint flash of red/green/blue.
I have a 5v 8A supply, I can measure 5v on the strip so its getting power.
I did notice that there are 2 config files, one located in /storage/.config and another in /storage/hyperion/config so i copied my new file to both locations. Shoud i delete 1?
Please Chris give me another life line!
AAHHHH This is sooo frustrating as i believe i am so close but it still isn’t working!?!??!
Ok, i don’t have everything hooked up as i am just trying to check the main parts. I just have the LED’s and a TV connected to my Pi and thought I can use the Android App to test my LED’s and it says that it is unable to connect. I have also tried running the test script for the LED’s to go RED for 5000 but that also says ‘unable to connect to host’
I though this might be the OUTPUT setting on the config tool as in another of the test scripts for Openelec install i noticed it ended with /dev/null and the default in the config tool is spidev??
Please tell me what i’m doing wrong as this is beginning to longer be fun and i’m losing sight of my end result :0(
Ok a quick update, i turned off the PI and re-conncted with Putty and tried to do the LED test again using the command:
storage/hyperion/bin/hyperion-remote.sh –priority 50 — color red — duration 5000
Now i get the response:
-sh: storage/hyperion/bin/hyperion-remote.sh: not found
But if i connect with WinSCP i can scroll to the file, does this make any sense?
try connect with putty and type:
LD_LIBRARY_PATH=/storage/hyperion/bin /storage/hyperion/bin/hyperion-remote -c red
If this doesn’t work, doublecheck your hyperion.config.json file:
vi /storage/hyperion/config/hyperion.config.jsonyour device section should look like that:
"device" :{
"name" : "MyPi",
"type" : "ws2801",
"output" : "/dev/spidev0.0",
"rate" : 250000,
"colorOrder" : "rgb"
},
output and type is essential, output must point to the spi bus device hook, type must match the LED chip type. After every change in the config file, you have to restart hyperion or reboot the Rpi.
killall hyperiondLD_LIBRARY_PATH=/storage/hyperion/bin /storage/hyperion/bin/hyperiond /storage/.config/hyperion.config.json
This will show you the output of hyperion as well. This could come in handy for further investigations..
regards
Thanks again for your support, if you wasn’t doing this my project would have long been scrapped!
So, after typing: LD_LIBRARY_PATH=/storage/hyperion/bin /storage/hyperio
n/bin/hyperion-remote -c red
I get the response:
/storage/hyperion/bin/hyperion-remote: error while loading shared libraries: libQtGui.so.4: cannot open shared object file: No such file or directory
Then when i typed:
LD_LIBRARY_PATH=/storage/hyperion/bin /storage/hyperion/bin/hyperiond /storage/.config/hyperion.config.json
I get the response that it starts loading all the effects but then ends with the following:
Hyperion created and initialised
run effect Rainbow swirl fast on channel 0
Boot sequence(Rainbow swirl fast) created and started
XBMC video checker created and started
Display opened with resolution: 1920×1080
Frame grabber created and started
terminate called after throwing an instance of ‘std::runtime_error’
what(): Json server could not bind to port
Aborted
Do i need to have the system fully connected or can i get away with just having the LED’s and my TV connected to the HDMI of the Rpi?
Another update is that i tried the first command again after the second and the response is:
Connected to localhost:19444
Set color to 255 0 0
But nothing happens with the LED’s?
Any Ideas?
Hi Chris,
I finally finished my setup but wanted to do some checks before i mount it back on the wall. My concerns to start is that there isn’t enough Amps, i have a 5v 3a (a guess) supply which I have just plugged into the micro USB. So first what did you mean when you said to Thomas to ground the GPIO pin? But secondly after using your method it seems I would need 6a in total. Is it best then not to use the micro usb port?
Finally should i be able to use the Hyperion Android app with just my LED’s connected as a test?
Thanks again for your help
Hi, glad you could follow. Generally, you’ll need 1 A per meter LED strip and 1 A for the Rpi. As described in the diagram, you have to power up the LED directly by a power supply and not through the Rpi. Basically, you don’t connect any +/- of the LED strip to the GPIO of the Rpi instead you connect them to the PS. If you go for the micro usb port variant, than you connect only the GND (-) of the PS/LED strip to the GND of the GPIO and power the Rpi by a plain cell phone charger. This will reduce any interference on the SPI bus.
Hope this helps.
Regards Chris
STK1160 do not work with current kernel of Raspbmc, it need to be downgraded: http://sourceforge.net/p/raspbmcusbtv/wiki/Installation/
Hi, are you sure? Looks like the link you posted is about the Fushicai UTV007 chipset grabber and not STK1160 grabbers but thanks for the hint.
Yeah link is about UTV007, but it does work with STK1160 as well. Just installed raspbmc yesterday with Network image (newest) and /dev/video* didnt show up, after kernel change it was there.
Here is more information about this:
https://github.com/raspberrypi/linux/issues/660
It seem that it wont work directly with 3.12+ kernels.
Disclaimer: Didn´t test grabber yet with Video signal, still waiting HDMI2AV adapter.
Anyone have the inside track on where to buy the EasyCap clone with the proper Chipset??? Thanks to Christian’s help I made it through part one of this tutorial and now I am trying to tackle part 2. The first EasyCap one I got from Amazon and it came with the Somagic SMI Grabber SMI-2021CBE which my Raspbmc didn’t see automatically.
I have looked at some of the web sites on here that explain how you are supposed to be able to compile the driver but none of them have given me that “a ha” moment to get it to work, so I am trying to find one of the EasyCaps that can be detected automatically like the STK1160. Thanks for any help you can provide on finding this elusive part !
That text above for the configuration for the embedded V4L2 grabber?
Hi,
Thanks alot for the help I really appreciate it. I was running 4.0.6 of OpenELEC so i will try the new beta. If this has teh driver do i need to still paste in that extra stuff in the config file?
Best Regards
What extra stuff do you mean? You will still need to configure hyperion with hypercon.
Hi Chris,
i have switched to openelec and now trying to install hyperion using on that. When i do the ‘lsusb’ i get ID 1b71:3002 and when I ask for ‘ls /dev/video’ i get ‘no such file or directory’. This isn’t going well is it?
What else can i try? I don’t we could skype or facetime if that isn’t too much of an invasion? I’m really excited about getting this install going but fear it could take me a while to get the programming part right :0(
Best Regards – Dumbass
Hi, it doesn’t look too bad, just read carefully, I wrote: “ls /dev/video*” with a *, which should result in “/dev/video0” and lsusb should result in: “Bus 001 Device 005: ID 1b71:3002 Fushicai USBTV007 Video Grabber [EasyCAP]”.
Make sure, you use the latest Beta OpenElec. I tried with 4.1.6, which includes the driver. You can easily upgrade openelec by copying the *.tar file to the update folder and then reboot.
After that, follow this installation guide for hyperion for OpenElec: https://github.com/tvdzwan/hyperion/wiki/Installation-on-RPi-with-OpenELEC
For the hyperion LED configuration, check my previous guide.
Regards Chris
Hi Chris,
Thanks for the tutorial, following yours has got me the closest so far and I have tried about 4!!
I always get really stuck on the programming part and I am so close to finishing that I’m getting really frustrated so pease help. I have RaspBMC and I’m I have the Fushicai USB grabber and I’m lost on how to install the extra modules, how do I do it?
I’m sure it’s really easy and feel free to start your reply with “Hey Dumbass”, looking forward to your reply.
thanks
Hi, I’m glad to help. Simply switch to openelec, it already includes the necessary kernel modules for the Fushicai grabber to work without loading modules.
Anyway, what is the output of “lsusb” and “ls /dev/video*”?
You can load the kernel driver with:
modprobe spi-bcm2708
modprobe videobuf2-vmalloc
modprobe videobuf2-core
insmod usbtv.ko
You can download a precompiled usbtv.ko from the blog post, but I’m not sure if it will work with the recent RaspBMC builds.
Regards Chris
Hi,
This is a great guide. I’ve followed the first half and through xbmc it’s all looking great. I have the parts for this on order.
Do you still need a raspbmc build or can you just do it via raspbian as the input is now the usb grabber?
Is there a setting to switch Hyperion between the USB grabber and XMBC (if you keep that build on)
Thanks for any help and for a really brilliant guide!
G
Hi, thanks a lot.
Basically, you can use any linux distribution that supports your USB grabber. Just make sure that your Rpi has still enough resources for running the grabber. You can switch between different hyperion clients (Hyperion app, grabber, xbmc grabber) by using the priority setting for each grabber in hyperion.config.json.
Regards Chris
Hi Christian. Thanks for your response. I’m sorry I haven’t been as quick to reply, but things have been a little hectic.
After further reading, I agree that a USB bandwidth issue could be the source of the problem, although changing frameDecimation and sizeDecimation parameters did not manage to fix the problem. (I believe I read somewhere that frame decimation and size decimation only take place after the image has been captured by the pi (after moving through USB)).
My lights also all occasionally flash Blue (matching the background of the XMBC) regardless of what is playing.
I also noticed that changing “Standard” from “no-change” to “PAL” reduced the number of errors displayed before a frame was captured (even though my converter was set to “NTSC”), but in doing so the image turned to black and white again. Changing the value on the HDMI2AV converter and the config file to PAL increased the number of errors again, but made the image color.
Do you think adjusting the configuration in framegrabber may help? Mine is currently set to defaults at:
/// The configuration for the frame-grabber, contains the following items:
/// * width : The width of the grabbed frames [pixels]
/// * height : The height of the grabbed frames [pixels]
/// * frequency_Hz : The frequency of the frame grab [Hz]
“framegrabber” :
{
“width” : 64,
“height” : 64,
“frequency_Hz” : 10.0
},
I’ve also read that the SD card speed may affect results. I’m currently using a Class 4 8GB card. Do you think moving my image to a class 10 will help?
Thank you again for your help.
Hi Freddy, well I don’t think moving to a class 10 will help that much. I’m using an first generation Rpi,256 MB Ram and a class 6 SD card. Well the setting of the converter and the hyperion config should be equal.
I’m not sure what causes the problem, you could try another usb hub or grabber.
my settings:
“standard” : “no-change”,
“width” : -1,
“height” : -1,
Regards Chris
Is it possible to run the screenshot in command in OpenELEC? When I try “hyperion-v412 –screenshot” it says “hyperion-v412 not found” and “./ hyperion-v412 –screenshot” results in “permission denied”
Hi Chase, I have to look into it, since I didn’t adjust the settings after switching to openelec.
Connect to openelec and switch to dir “/storage/hyperion/bin” and execute hyperion-v4l2 with your settings. “LD_LIBRARY_PATH=/storage/hyperion/bin /storage/hyperion/bin/hyperion-v4l2 /storage/.config/hyperion.config.json –screenshot”.
Regards Chris
Hello!
I’m trying out your commands on my raspi running Hyperion but am getting the following errors:
Frame too small: 824656 != 829440
Frame too small: 823284 != 829440
Frame too small: 818602 != 829440
Frame too small: 821906 != 829440
Frame too small: 817630 != 829440
etc, where the first number constantly changes, but is always below 829440
I am using a stk1160 and I am using the same hyperion configuration file as you and getting the same results when I do lsusb and ls/dev/video* (I also remembered to kill hyperion)
do you have any idea what is going on? I’m having trouble understanding what could be causing this error message.
Any help would be greatly appreciated. Thank you for creating this guide.
Hi Freddy,
It seems like hyperion receives too little information from the grabber. This could be an USB hub bandwidth issue. You could also try to increase the “frameDecimation” and “sizeDecimation” parameters in the hyperion.config.json file.
Hope this helps, regards Chris
Hi,
I followed your guide – it helped a lot.
I am tring to get the screenshot from my grabber but I keep getting an error:
“VIDIOC_S_FMT error 16, Device or resource busy”
What does this mean?
Thanks!
Hi, it seems like an other process is using your grabber. Make sure hyperion is not already running at the time you’re trying to grab the screenshot.
Regards Chris
I will also go with one more question. As I would like to connect 4 HDMIs (TV, XBMC, PS4 and blu-ray) to the ambilight – what kind of splitter should I go with? Should I simply have 4 splitters?
Dear Christian,
Indeed great guide. I will probably follow it step by step. The only thing which bothers me is the efficiency/latency. Have you observed any delays between the screen and ambilight colours?
Thanks,
Tomasz
Hi Thomasz,
I didn’t observe any noteworthy delays with my USB grabber, yet. If you have 4 HDMI inputs, you probably want to connect them to an AVR and then the single output of the AVR to one single splitter. Perhaps there is a cheaper HDMI switch, to reach a simular solution.
Regards, Chris
Great guide. I’ve followed all of the instructions but I’m having an issue with the HDMI2AV converter. When I connect my HDMI source, it detects the 480p composite connection output and changes the output resolution to match, thus I see my PS4 on the TV and via the USB video grabber, but the resolution is no longer 1080p, it’s changed to 480. Does this happen on yours? Could it be an issue with the HDMI2AV converter?
Hi Aaron,
Yes, this is as it should be. Composite, analog video does not support 1080p (max 480i or 576i). So, Hyperion will capture color information from the USB video grabber with a lower resolution than the original HDMI input signal. But this doesn’t matter at all, because we just extract the color information from the signal and don’t show any images. Furthermore, your Rpi will thank you for the less work load 😉
Regards Chris
Would it be possible for me to use this http://octavainc.com/HDMI%20switch%204×1%20ARC%20port_pro.html with this setup?
If you use an HDMI splitter connected to the output and with this solution, it should work
How long is the delay with this solution compared to the XBMC-solution? You don’t happen to have a video showing the colors changes with this setup?
Hi Marcus
Well, In my opinion the delay is not really noticeable compared to the XBMC solution. I don’t have a video to show yet, but will made one soon. Will upgrade my Rpi xbmc build to the current openelec one, so I’ll be able to test with a more up to date kernel driver for my USB grabber.
Hi,
latest OpenElec testbuilds for Raspberry Pi have the usbtv module included for now on (as of 19-Jun-2014 #0619)!
https://github.com/OpenELEC/OpenELEC.tv/issues/3140
http://forum.xbmc.org/showthread.php?tid=192380
So after that, it’s just a matter of installing Hyperion on Openlec (it also works for the testbuilds following the instructions from https://github.com/tvdzwan/hyperion/wiki/Installation-on-RPi-with-OpenELEC )
I’m also using a Fushicai UTV007 (ID 1b71:3002) and it now works perfectly.
It’s now really simple to install and simplify your how to.
Anyway thank you very much, my ambilight is really awesome thanks to you 🙂
Regards.
Hi, you’re welcome and I’m glad that you enjoy your ambilight experience!
Yes, it seems they have closed my opened issue but I didn’t have the time to retest it, so thanks for your testing feedback! 😉
Regards, Chris
Hi,
any ideas about what to do if you get an all gray image with green stripes from “hyperion-v4l2 –screenshot”? I have absolutly no idea what to do 🙁
http://imgur.com/ezp0nmW
Cheers,
Matthias
Well, what kind of usb grabber do you have? try “sudo apt-get install v4l-utils, than v4l2-ctl –all”, it should give you detailed output about your grabber.
Hi there Christian,
Interesting post and I am going to set up the ambilight.
1 question, my I use my old PC as my HTPC. It uses a VGA output to my television. Would this be compatible? And what changes would I have to make?
Well, you have to feed the USB grabber connected to the Rpi with an analog signal from the HTPC. Perhaps your old PC supports simultaneous output of two analog video signals? You could test this with a second analog monitor connected to your HTPC.
Hi Christian. Thank you very much for these instructional posts. I intend to try this out as soon as possible but I was wondering, would it suffice to use an xbox one with a HDMI splitter instead of an AVR. The xbox one has both an HDMI input and output. Thanks once again.
Hi Abbas, well I don’t have a xbox one to test but it should work when you connect the xbox one HDMI output to the HDMI splitter. Then from the splitter directly to the the TV and to the HDMI to composite converter/ USB grabber which will finally lead to the Raspberry Pi.
This way you should got ambient light for the xbox media as well for the devices connected to the xbox HDMI input.
Regards
Looks like it was a driver problem, I was able to get it working pretty well using an old kernel 3.6.11+ which had an easycap driver instead of a STK1160 driver. That worked fairly well, was down to about a .25 second delay. It also didn’t crash or randomly flash LEDs. I then tried the opposite and used a bleeding edge kernel build of Raspbian, 3.12.19+. It apparently updated the STK1160 driver and now I’m down to a .1 delay which pretty much looks good.
I’m still looking to see if It can go any lower though. Compared to AmbiBox which I used before and running on the same computer it’s still noticeably slower. There’s almost 0 delay when it’s being generated on the same computer.
I’ve ordered a couple more random easycap devices on Amazon to see if I can’t get a UTV007 in the mix and see if there’s a noticeable increase.
You may actually have been lucky you got the Fushicai UTV007 instead of STK1160. I just got all my parts and been trying to get the STK1160 working decently, but there’s been many issues such as randomly Flashing LED and when it does work there’s about .75 second delay which for the lights is unusable.
Reading some of the comments on Hyperion’s forum it seems the Fushicai is actually the way to go.
Hi Arnold, I wasn’t aware of that, thanks a lot for the hint! Do you think it’s a driver problem of STK1160 or is it related to Hyperion?